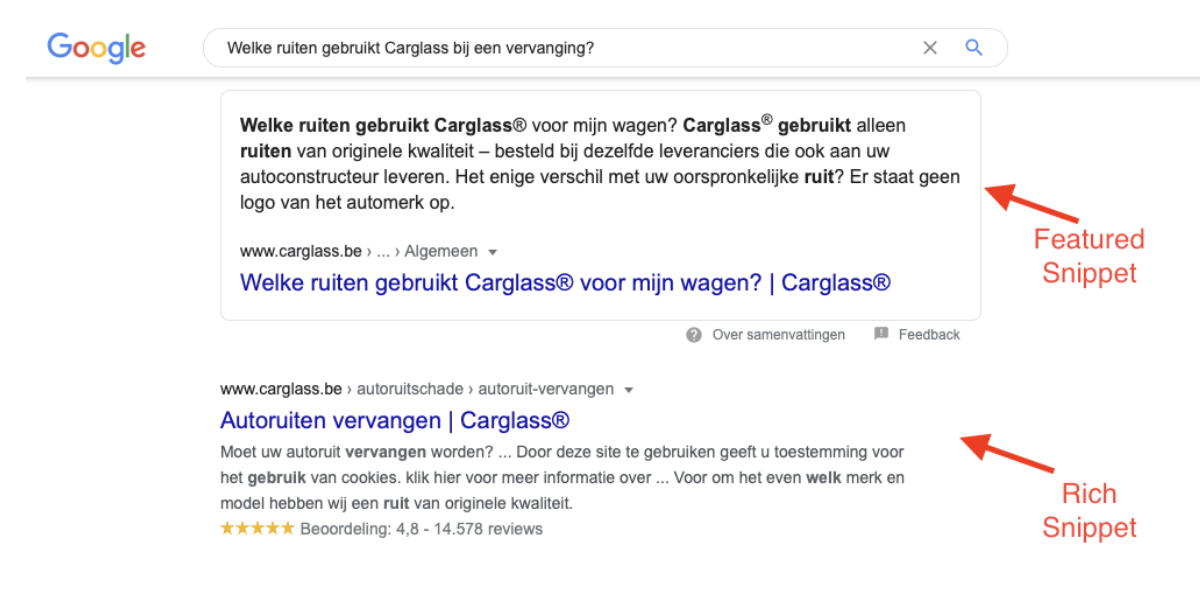
Introduction
Mid August 2020, Into our first article “What is Server-side GTM and why should you care? A very short introduction.” we explained why you should care about the new beta launch.
Server-side tracking is actually not new. Tealium & Segment were already offering the option. In the past Google was addressing server to server solution with for instance the Measurement Protocol. But now the market leader Google is joining the move for his Tag Management System with their public Beta (free solution while it’s not the case for others).
Our industry is evolving regarding privacy challenges and towards a “cookieless” world. Tag Management Systems are adapting themselves towards positive enhancements.
GTM Server-Side (SS) has been a hot topic for the last couple of months now. In this article we will explain what it is and the advantages to understand the buzz.
Usual way to use GTM
Before explaining the new Server-Side, let’s understand how the classical “client side” GTM is working.
- Your classical GTM is implemented thanks to a container ( Javascript snippet) in the source code of your website.
- When the page loads, this GTM container loads as well and fires the tags based on your architecture ( on the illustration below, it’s an analytics tag, conversion and 3rd party tag). Everything is happening client (browser) side.
- While firing the tags, they collect data and send it to various servers like GA, Google ads or 3rd party analytics. Together with the tracking code, some additional information about the pages are sent ( like the page, device, etc).
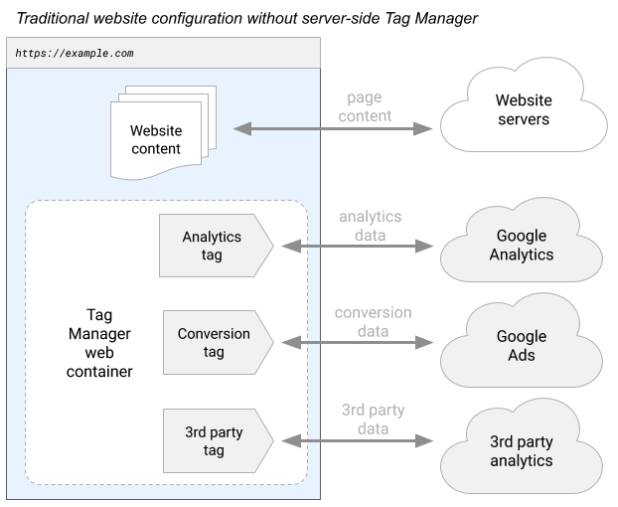
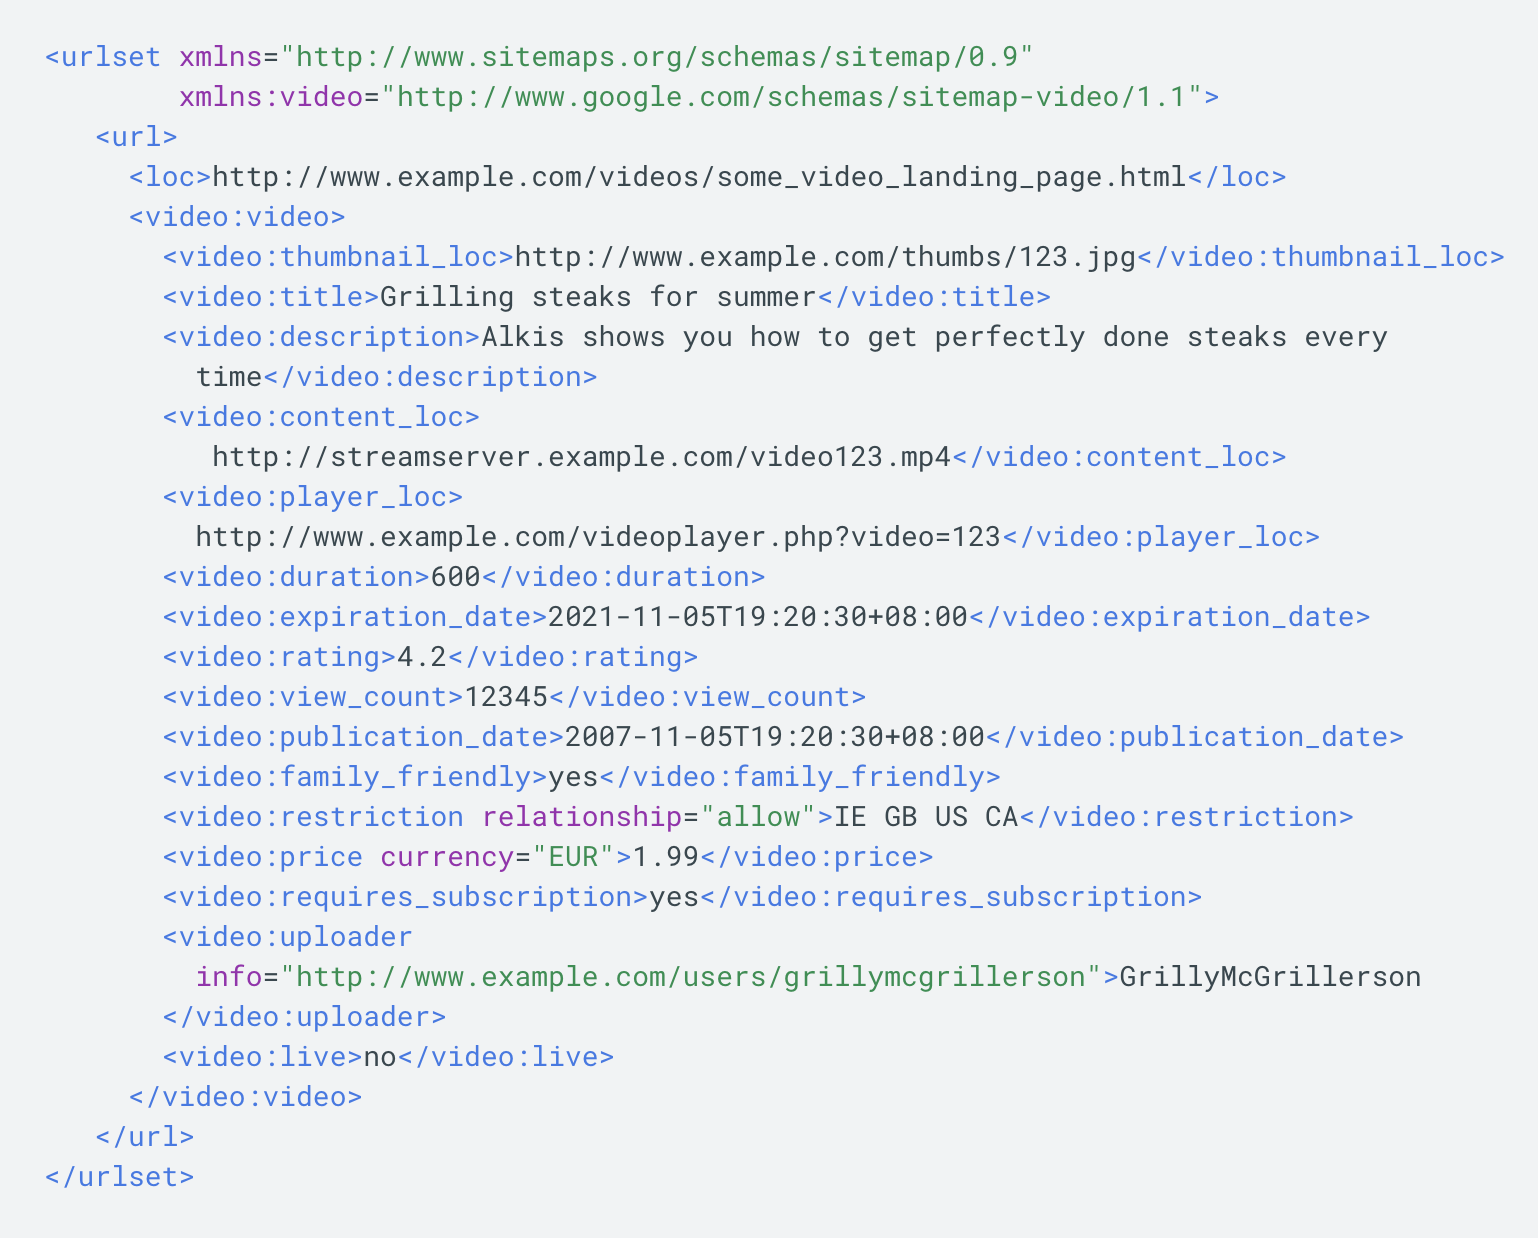
Illustration from Google Developer guide.
Server-Side GTM
By contrast in this configuration, Google Tag Manager container is in a server-side environment (and not client side ). This new server container type resides in Google Cloud environment: Ideally in a custom subdomain in the same domain hierarchy as your website. That way, the request is considered as first party context, which has a significant impact on how cookies are treated.
The flow is the following:
- The GTM SS is getting data (into this server container) from his code on the client-side (don’t be surprised to see the term “client-side”here. It still needs to capture the information). The server of GTM SS is on Google Cloud Platform living on a subdomain of your site. (Sidenote: you can also have a direct server to server connection)
- GTM SS will process the data, manipulate it and then send it to GA for instance.
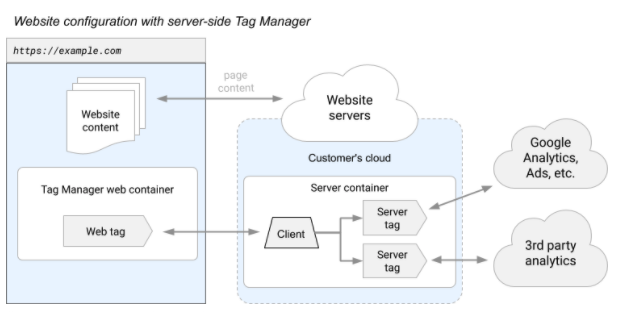
Illustration from Google Developer guide.
Advantages
At this stage you could ask yourself the following question: “why should we add a step to the data collection process? “. Let’s understand this through the key advantages:
A. Reduced load on a page
Every web page has to load and process a lot of resources while we know speed on a website is extremely crucial. With the GTM SS, instead of loading all the scripts on your website, it will only load some of them.
How ? Those scripts would actually send the data to your GTM SS container and process the data & scripts from there. The tags require less work on the browser but shifting this workload to the server instead. Concretely what stays in GTM on your browser has less to process so that the website can run faster.
Moreover, the unified event format that GTM SS is using enables it to simplify to a single call.
B. Control what kind of data is sent to vendors
As mentioned earlier, the traditional tags are gathering more data on your website than instructed. They for instance collect information about your device like screen size, page information but also fingerprinting and cookies.
From a privacy statepoint this can be scary and could lead to leaks of personally identifiable information (PII).
With GTM SS, you are adding a layer of security. This is completely different from the current dynamic because you own and have full control on the Server-Side environment. Visitors data are better protected by collecting and distributing data in a server-side environment. The server of GTM operates in your own Google Cloud project and you are the only one to have access to the data until you decide to send it elsewhere. There are no data leaks with third-party cookies or surprise with injected url parameters.
Let’s give 2 examples:
- With GTM SS, your Facebook Pixel is communicating only with your cloud server but the visitor’s browser cannot be reached anymore ( client-side).
- If your GTM SS container is collecting personally identifiable information (PII), you can clean the data there before sending it somewhere else.
In summary, the tracking requests are sent to your domain and not to a third-party domain.
Limitations to adoption
Until now there is only good news but you feel the “Yes but” coming.
There are indeed two elements that could slow down the adoption:
- There are new rules that are asking different skills : digital marketing is becoming more technical. You will also need access to the Server-Side container to debug what is happening inside.
- GTM SS is a free tool. But you need to host that Server-Side container for instance on Google Cloud Platform. Stay reinsured this should be reasonable and represent around an hundred euros per month per server. Larger amounts of network traffic could increase this amount.
Conclusion
The entire industry is shifting towards 1st party data. GTM Server-Side is thus the logical evolution in terms of privacy, data governance but also in quality (speed page enhancement for instance).
We should all prepare for it but keep in mind that GTM SS is still in Beta and will continue to evolve until the finished version. For instance third party tags are not yet supported but only GA UA or GA4. This means a complete transition is not yet possible and we should keep in parallel the current GTM with the other tags. But seeing the advantages it definitely is the moment to test and consider it.
Important to remember that GTM SS is facilitating privacy but doesn’t make you GDPR compliant. The consent matters and not the technology used.
Regarding your knowledge on GTM (client-side), don’t worry it’s not obsolete: GTM SS is still using tag, trigger, variable model but has some novelties added.
Finally, this shift of processing data to Server-Side is opening the door on endless possibilities...
Want to know more about server-side GTM? Contact us at
{snippet margauxmarien-en}